STAR WARS Jedi: Fallen Order – Strategy Guide

Strategy Guide Combat Training
Tips as well as Tricks
Combat Mechanics
First things first. You must truly sympathize your moves as well as corresponding controls earlier you lot tin acquire by properly.
Combat Meters
You as well as your opponents withdraw hold Health as well as Block meters. Keep glancing at those during a fight.
- Health: null agency expiry respawn.
- Block: (I’ll telephone telephone it Stamina too) Fills upward past times nailing hits, etc. Depletes when Blocking hits.
- Force: Goes downwards when casting Force powers or attacks. Fills upward past times nailing hits, etc. (“etc” tin hateful many things, no spoilers 🙂 Important tip: also goes downwards when you lot acquire hit!
Combat Moves
Block: Holding the Block clit volition block most attacks (except the red-glow ones), so it’s powerful, but alone spell you lot withdraw hold Stamina. When you’re out of Stamina, you’re broad opened upward for hits. Be wary, you lot can’t block if you’re Recovering (from a displace or a hit).
Parry: If you lot hitting the Parry/Block clit but at the right fourth dimension (*just* earlier the enemy hits you), Cal volition perform a Parry instead of a Block. Parrying is good. It gives you lot Stamina as well as depletes your enemy’s stamina. Moreover it ofttimes leads to truly overnice acquire by animations, as well as finishing moves.
Attack: This is your fast as well as complimentary attack. Nailing hits raises your Block as well as Force meters.
Force Attack: H5N1 lightsaber attack, but to a greater extent than powerful as well as slower. Needs Force. To live used when there’s a long plenty opening, or after Slow (and alone when you lot withdraw hold Force inwards your Force meter!).
Evade: Press in 1 lawsuit for a real quick evade maneuver. If timed right, (just equally enemy is close to province a hit), it leaves you lot gear upward for an immediate activity afterwards. Note that Evade tin live used past times itself, or alongside a LS direction. It costs cypher (doesn’t occupation whatsoever Stamina).
Important tip: Press Evade to acquire upward to a greater extent than chop-chop after you’ve been knocked down! This unremarkably makes the divergence betwixt getting nailed repeatedly vs. getting out of the cycle.
Roll: Press Evade twice for a Roll, along alongside management stick, to scroll out of the way. Longer recovery. Note that you lot tin Roll forward, which tin avoid some enemies outpouring attacks.
Jump: Backflips when you’re fighting. Useful to move out of the trend too. However you’re all the same vulnerable when inwards the air as well as many hits volition province anyway, so it’s non a practiced evasion tactic. But, real useful if you’re inwards a acquire by as well as wishing to outpouring off a platform. Note: if Targeting, outpouring management liberty is real express (Cal volition ever maintain facing the Target). Also, some bosses’ attacks (ground swell etc) tin alone live avoided using jump.
Sprint (Run): Push inwards LS (Left Stick) alongside a direction. You don’t withdraw to maintain it pushed inwards equally long equally you lot maintain running. Actually quite useful to acquire away from your enemies inwards larger areas (and auto-deflect Light Amplification by Stimulated Emission of Radiation shots if you lot made that upgrade). You’ll probable wishing to plow off Target when running away.
Target: Push inwards RS (Right-Stick) to toggle Targeting on/off. Use RS management to select dissimilar enemies. Settings has auto-options for this, discussed elsewhere inwards this guide.
Heal (Stim BD!): Restores constituent of your Health. Takes a flake of setup fourth dimension where you lot withdraw hold to non initiate whatsoever other activity or you’ll cancel it. Important tip: You tin Evade right after Cal receives the stim shot as well as earlier the whole Stim animation is finished. This tin live a lifesaver!
Single-Blade / Double-Blade select: This is required cognition in 1 lawsuit you lot withdraw hold the double-saber, as well as is piece of cake to miss. D-pad Left to select unmarried blade, D-pad Right to select double blade.
Recovery: H5N1 Definition for this guide. Time when Cal won’t accept whatsoever input from you lot because he’s “recovering”, i.e. finishing a motion or laid on animation, or recovering from a hit. Yeah, it’s that frustrating constituent 🙂 BUT, tin unremarkably live shortened alongside Evade!
Parry/Evade Timing Window: The margin of fourth dimension you lot withdraw hold from timing it perfectly vs not. The harder the Difficulty setting, the smaller the window.
Force Powers
The Force powers touching 1 or multiple enemies, for varying amounts of time, equally you lot upgrade Cal.
- Force Slow: Slows time.
- Force Push: Pushes object as well as enemies away.
- Force Pull: Pulls inwards objects as well as enemies.
Important Note on Force Powers:
Quick-tapped Force power: The Force powerfulness when pressing as well as releasing the Force button. Usually much faster to cast (but of lesser effect), than the Held Force power.
Held Force power: Obtained via upgrades of Cal’s base of operations Force powers. e.g. Slow, as well as Hold Slow. Usually slower to cast, but much to a greater extent than powerful.
In combat, fourth dimension is of essence, so acquire how to occupation your Quick-tapped powers separately, *especially* after you’ve bought the corresponding Held Force power! Likewise, when you lot wishing to cast the Held version, brand for sure you lot withdraw hold plenty fourth dimension to do it!
Combat Tactics
- Read as well as sympathize the Combat Mechanics descriptions above, at that spot are key combat tactics inwards there.
- Prioritize Defensive over offensive. You’re a Jedi, non a Sith. Keep a cool caput as well as report your opponent.
- But you lot can’t but live Defensive: you’ll run out of Block meter or they’ll pick away at you.
- You withdraw hold to pose inwards some attacks inwards there.
- Attack, but don’t acquire greedy. Get 1-2 hits in, as well as so Evade away as well as assess. The tertiary Attack volition unremarkably acquire you lot into trouble.
- Timing window for Parry/Evade is but earlier you lot acquire hit. This requires studying your enemies’ laid on sequences.
- Fights are rarely “clean” inwards this game, it’s normal to acquire hit. Even pros acquire damaged, specially against groups or Bosses.
- Enemy combos/Hit flurries: some harder enemies volition start hitting you lot as well as acquire 2,3,4 hits inwards on you lot as well as you lot mightiness experience frustratingly helpless mashing the Block as well as Evade buttons. There’s niggling you lot tin do close it in 1 lawsuit they’ve started, when they don’t give you lot plenty Recovery fourth dimension to do anything. For example: fast monsters, special troopers. What you lot *can* do is: hitting the Evade clit but earlier the side past times side hitting lands, because an Evade tin live faster than movement/attack recovery). Ideally, forestall this sequence from landing the rootage hits on you lot past times using Evade (especially), Block or Roll.
- Block is useful, to acquire you lot enemy’s laid on patterns. Try to acquire 1 blueprint at a fourth dimension as well as memorize it. Then the side past times side pattern. If you lot endeavour to holler upward them all at once, you lot won’t holler upward anything. Identify the halt of laid on patterns when the enemy takes a break. That’s your Stim or laid on window! Then switch to Evade in 1 lawsuit you lot know some timings. Parry in 1 lawsuit you’re confident.
- The risk alongside Block: if you lot run out of Block meter, as well as so can’t Block anymore as well as if you lot endeavour you’re broad opened upward for enemy hits.
- Evade is your friend. It’s safer/better than Parry (1 press, non double press). It has almost no Recovery fourth dimension as well as puts you lot behind opponent gear upward to province a complimentary hit. Not equally risky equally Parry for flurry of hits.
- Roll (double-press Evade) is risky because you lot withdraw recovery time. If attacks come upward inwards fast sequence, the enemy volition withdraw take hold of you lot on its 2nd or tertiary attack. So live cool as well as Evade at what seems similar the right time, you’ll live surprised at how much that opens upward the acquire by for you.
- Roll is indeed necessary sometimes to acquire you lot far plenty out of reach, specially from Red attacks.
- Parries are cooler though: they opens upward cool animations, finishing moves as well as meliorate fighting enjoyment, in 1 lawsuit you’ve learned your enemy’s timings well.
- Some non-Red enemy attacks can’t live Parried, I believe, or are real hard to fourth dimension properly.
- Humanoids as well as monsters acquire by quite differently; develop tactics for each.
- Humans: Evade is real useful against them, as well as subsequently Perfect Evade. Block works good too.
- Monsters: Evade as well as Roll are your go-to defenses. Successful Parry tin freeze many monsters instantly equally they ofttimes don’t withdraw hold a Stamina meter.
- Perfect Evade (an upgrade) rocks.
- The basic Attack is also a combo: 1 Attack doesn’t do much damage, but a 1-2 Attack is decent, as well as iii Attacks inwards a row do equally much impairment equally the Force Attack. It doesn’t occupation whatsoever Force (in fact it gains you lot Force), has a much faster launch, as well as you lot tin abort after 1 or two attacks alongside an Evade if you lot encounter that the enemy is readying a counter attack.
- Attack is your go-to offense, acquire to occupation it a lot.
- Slow: Combining Attack alongside Slow is real powerful. Example: do a 1-2 Attack, Slow, as well as so 1-2 again. Or a 1 Attack, Slow, 1-2-3-Evade, as well as your Force is right dorsum where it was.
- Keep inwards heed that Slow doesn’t terminal equally long in 1 lawsuit you lot start hitting the enemy, so don’t acquire greedy alongside your attacks.
- Maneuver strategically: Hit from the side or behind. This unremarkably gives you lot a safer laid on window, as well as it seems to me it does to a greater extent than damage.
- Time your hits alongside the enemy’s recovery: a corking fourth dimension to occupation your Force Attack is when the enemy is but finishing a combo. It gives you lot wind-up time. Alternatively, you lot mightiness consider using Attack-(Attack)-Slow-Attack-(Attack)-Evade instead, as well as you’ll come upward out ahead inwards your Force meter.
- Use the surroundings to your advantage: Push off ledges, occupation crates equally protection from ranged attacks, etc.
Combat Tactics Continued
Study your enemy:
1) Identify Stim opportunities. Study enemy laid on pauses, as well as holler upward them. They’re unremarkably after crimson attacks or long laid on combo sequences. Remember these equally times for you lot to occupation a Stim. If the enemy is truly fast, you lot tin stretch the fourth dimension alongside Force Slow.
2) Be defensive first. Study their laid on sequences, spell Blocking or Evading. Blocking meter goes downwards alongside hits, but it refills pretty chop-chop in 1 lawsuit you lot release Block; but occupation Evade, Roll or Run for 1-2 seconds as well as you’re practiced for some other bunch of Blocks.
3) Launch 1 or two measure Attacks as well as autumn back. This volition refill your Block as well as Force meters too.
Don’t acquire greedy! You’ll acquire punished if you lot endeavour to pose inwards equally good many attacks inwards 1 go.
Getting hitting truly hurts!
No kidding right? I’m for sure you lot know that already… specially at Grand Master difficulty!
But that’s non my point…
Every fourth dimension you lot acquire hit, you lot lose Health as well as Force!!
It’s a double-whammy, as well as that’s why it feels similar everything but falls apart sometimes! That’s why when you lot acquire pounded past times a boss, you lot ever current of air upward alongside no Force left to occupation somehow.
This is why Parry is much riskier than Evade. If you lot miss, you lot lose Health as well as Force, as well as are opened upward for to a greater extent than hits during your Recovery time.
If you lot Evade equally much equally needed, as well as so Attack, repeat, you’ll gain Force, which you lot tin as well as so occupation to assistance you lot province to a greater extent than Attacks.
Block is also free, alongside no Recovery time, equally long equally your Block meter doesn’t run out. It fills dorsum upward equally good when non blocking.
But, Parry truly reveals the Jedi Grand Master inwards you. So construct upward to it, as well as you’ll experience corking when you lot occupation it!
Target function:
Learn to occupation as well as command the Target role (push inwards RightStick on consoles). Cal maneuvers real differently if Targeting vs non Targeting. When targeting, Cal ever faces the enemy, as well as aims his attacks at the Targeted enemy. This is useful most of the time. You’ll wishing to select as well as Target the desired enemy (using RS), as well as destination him off earlier moving to the side past times side one.
In some instances (to occupation a Stim or assemble your wits) you’ll actively wishing to run away, as well as to do that you’ll withdraw to plow off Target inwards the oculus of the fight. If you’re trying to run away as well as Cal’s but going around the enemy inwards circles, it’s because you’re Targeting that enemy.
I strongly recommend chop-chop learning to command Targeting.
There are Target options inwards the menus: I personally withdraw hold them both off, but it’s your call.
Auto lock target inwards combat=OFF: allows me to grip the distanc ranged attackers freely
Auto switch target on enemy death=OFF (I don’t similar the visible enemies alone option, because if enemies are visible it’ll Target, if behind you lot it won’t – I notice it’s an inconsistent experience which distracts me inwards the oestrus of combat).
Groups: There’s an social club to this madness!
1) Defeat ranged attackers first. Run toward them (esp. if you lot bought the runparry skill) as well as kill them. If they’re out of reach, occupation your lightsaber’s Parry, but earlier the shot hits you.
2) Defeat weaker melee enemies.
3) Defeat stronger enemies.
Tips:
- Use the double-saber if you lot withdraw hold it: it lands hits all around you lot and/or forces enemies to block thence preventing them from attacking you.
- Evade as well as Roll; Keep on moving: you’ll avoid ranged attacks as well as attacks from side/behind.
- Run when needed. Use your Force powers to acquire rid of the weaker enemies (Push…). Note that you lot tin all the same acquire hitting spell running. The laser-deflect-while-running science (Agile Deflection – in 1 lawsuit available) is real useful for that.
- Try to dissever the enemies up, don’t allow them gang upward on you. Get around them so they’re all inwards front end of you, ideally alongside 1 or two close you lot that you lot tin laid on earlier the others acquire there.
- Target 1 enemy at a fourth dimension until you’ve killed it, as well as so the side past times side one. You don’t wishing to live lightly damaging everyone hither as well as there; you lot wishing to bring down their numbers asap: v heavily damaged enemies brand equally many attacks as well as motion equally much impairment equally v full-life enemies.
Laser shots:
Block deflects Light Amplification by Stimulated Emission of Radiation shots fifty-fifty if you’re non looking towards it.
You tin Parry as well as reverberate Light Amplification by Stimulated Emission of Radiation shots dorsum direct at the attacker. It’s timed, as well as easier alongside the unmarried lightsaber. The Parry timing from when the shot is fired varies alongside the distance of the trooper, because the timing window is but earlier the shot hits you. Give yourself room, hold off for it, kill them off 1 past times one. Note that you lot don’t fifty-fifty withdraw hold to live looking at who’s shooting at you. Listen for the shot firing, as well as so hitting your Parry, similar a truthful Jedi!
The Agile Deflection science is real effective for large groups alongside ranged attackers, encounter the Recommended Skill Point upgrades section.
Stims:
Get to know how much Health your Stim volition restore. During combat, maintain an oculus on your health, as well as equally shortly equally you’re below that threshold, move far a priority to notice a fourth dimension window to occupation a Stim. This trend you’re non wasting whatsoever Stim potential, spell keeping your Health at maximum margin. Don’t hold off until you’re almost dead. Also, wasting a flake of Stim wellness isn’t so bad, vs dying which has you lot start over completely.
Sounds:
Cal’s oofs as well as grunts don’t ever hateful you lot got hit, don’t allow that faze you.
Look for as well as acquire the monster animations, as well as also the sounds that give you lot hint equally to when they’re close to hitting you.
Animations are sometimes counter-intuitive to your dodge/roll management ex.: alongside some real large monsters, you lot tin scroll *toward* their attacking arm equally they’re sweeping at you lot to both avoid the hitting as well as acquire to its side for you lot to acquire a complimentary hitting inwards on its side or back. Experiment alongside all directions, as well as whether but dodge, or scroll needed. Bigger dudes ofttimes withdraw Roll.
Range as well as Realism
Normally, what you lot encounter is what you lot acquire (WYSIWYG). If the animation shows you lot hit, or got hit, it happens.
Evade is a flake “magical” as well as that’s why it’s misunderstood. It’s NOT WYSIWYG. If your timing is right, the animation of the hitting volition move right through you lot alongside no damage. For everything else, there’s Mastercard. Ahem, for everything else, if the animation hits you, you’ll acquire damaged. Oh 1 to a greater extent than affair close Evade, if your timing is NOT right, but it got Cal out of the trend enough, the animation misses you lot so you lot won’t acquire hit.
Jump, on the other hand, seems real “unmagical”; opposite to many games, most attacks volition hitting you lot when you’re inwards the air. So occupation outpouring carefully. Except for ground-swell type attacks, where you lot withdraw to outpouring to avoid them.
Contrary to other games, when you lot hitting Attack, Cal volition swing, but the game does non brand him acquire closer to the enemy earlier swinging. So, if you’re equally good far away you’ll miss. Enemies know your hit as well as they’ll dorsum out of range. Consequently, inwards this game attacking is also close moving your grapheme within hitting range. Yes that takes a flake of fourth dimension as well as it breaks your momentum, but that’s how it is. So acquire used to actively moving toward your target betwixt attacks. Moving is an integral as well as essential constituent of combat. Moving away is critical too, unremarkably via Evade, Roll, or Run, or double-jump in 1 lawsuit you lot withdraw hold it.
So combos are non pre-programmed to hitting similar inwards some fighting games, they’re to a greater extent than realistic really. Whether they province all depends on your seat relative to your opponent’s, their reactions, your respective timings etc. In this organization you lot variety of brand you lot ain combos on the spot past times reacting as well as using the appropriate counter-moves on the fly!
Get to know your range(s): Practise all this alongside no enemy around. Swing your principal attack, it has a for sure range. Now if you lot withdraw hold Delay Thrust (X + X), endeavour it, you’ll encounter how much farther the 2nd hitting goes. That’s what makes that laid on so useful, addition it doesn’t acquire blocked most of the time. Try Force Attack. It doesn’t halt here! Time to truly acquire to know the tools at your disposal: Try Evade spell belongings upright, as well as so Attack. Now you lot hopped inwards closer to your enemy as well as landed a quick attack! Try Roll as well as so Attack… slower but long range! Try your Run + Attack science (if you lot bought it), encounter its hit in 1 lawsuit you lot hitting the Attack button.. pretty far. Now depository fiscal establishment check how long you lot withdraw hold to truly Run earlier hitting Attack to acquire it to trigger… perhaps 1/2 a second? non that long right! So you lot tin Run for 1/2 a 2nd as well as so Attack as well as you’ve covered a lot of distance inwards a brusque time! Useful equally a combo alongside Hold when opponent is medium range. Also endeavour Run+Attack, Hold, Attack+Attack, for example.
Get to know all these. They are all basic combat “combo” options you lot withdraw hold at your disposal, as well as should acquire familiar alongside as well as occupation the right 1 at the right time.
Get to know your speed(s): Same equally above, acquire a experience for how fast or dull your attacks are. Force Attack is pretty slow; so you’ll withdraw hold to occupation it alone when you lot withdraw hold an opportunity. Try Attack-Attack-Attack, equally fast equally you lot tin crush it. Pretty fast right? 1-2 faster than 3. Now endeavour doing it a flake slower.. you lot withdraw hold control… but if you’re non hitting Attack-Attack-Attack fast enough, you’re also wasting opportunities. So you lot tin somewhat crush these, but halt earlier it’s equally good late! (better yet, fourth dimension them but right). Alternatively, you lot tin do two quick Attacks, as well as so hold off a spell as well as Attack again, to trigger your Delay Thrust attack; a pretty powerful combo.
Any enemy that gets hitting past times your saber inwards the animation gets hit. Not but the 1 you’re targeting, or intending on hitting, or fifty-fifty seeing. If you lot problem upward two enemies as well as brand an overhead laid on you’ll hitting them both alongside 1 Attack, fifty-fifty alongside the single-saber.
The double-saber swings broad all around, as well as anything touching it inwards the animation gets hit; that’s what makes it strong against groups of enemies, you’re hitting materials you’re non actively focusing on.
Lastly, ever endeavour acquire around your opponent, to its side or back. The face-to-face seat is the hardest because that’s where your enemies’ attacks are the strongest, as well as so are their defenses. Most monsters are completely vulnerable from the side or back. If you lot laid on humanoids from the side or back, you’ll unremarkably acquire hits inwards regardless of their block meter! Use displace (the joystick), Evade-with-direction, Roll, (sometimes jump) to do so. You tin occupation Slow on fast enemies, as well as so acquire to the side or dorsum as well as launch a few Attacks.
Combat Training
Here’s a strategy, you lot tin accept a flake of fourth dimension hither as well as at that spot to develop as well as acquire to a greater extent than comfortable alongside combat, as well as and so you’ll savor it fifty-fifty more! This game could truly withdraw hold used a Practice Arena. There’s non much guidance given to you lot on how to fight, as well as for players non familiar alongside other Souls-like games, the ramp-up tin live harsh, sometimes discouraging.
If you lot but play the game along the storyline as well as maintain going, you lot may notice you’re ever but behind the science flat you’d similar to live at, because they maintain throwing to a greater extent than materials at you. Wow you lot scaped by, but defeating your 1st Purge Trooper, that was tough! Then a flake subsequently they throw two of them at you…!
BUT, you lot tin create your ain Training Grounds!
Identify Practice areas, equally you lot progress through the game, that withdraw hold practiced fights close a Save/Respawn point. Then brand a Saved Game backup if you lot tin (see side past times side section). Then move fight, learn, die, as well as repeat. Since you lot know you’ll respawn closed by, there’s no pressure, as well as you lot tin relax as well as start truly paying attending to the enemies, endeavour things as well as learn. When you lot start winning the fight, don’t halt there! Go dorsum to the Respawn point, Rest (so enemies come upward back), as well as redo the acquire by over as well as over.
Get into this sentiment of practise sessions early on inwards the game, as well as it’ll truly pay off alongside your enjoyment as well as ability. It’s unremarkably easier to do this when you’ve finished a department of a map as well as you’re backtracking.
Nurture your inner Jedi: Be calm as well as distant from your emotions. Getting killed is constituent of the learning process, don’t acquire mad when you lot do but accept it inwards stride.
Practice against unmarried opponents whenever possible, taking your fourth dimension to testify out Evade as well as Parry timing as well as laid on sequences etc. Timing your Roll, Run or Jump to acquire away from its diverse Red attacks.
Split your learning upward inwards pocket-size bits. Focus on a specific affair to acquire earlier every (planned) fight, for example:
- Practise Combat spell NOT using Force moves (or perhaps but Slow for Stims).
- Then practise inserting specific Force moves (Slow, Pull attack, Push over ledge).
- Enemy laid on sequences
- Evade/Parry Timing
- Experiment Force powers alongside each enemy type: some are highly susceptible to some Force moves, such equally Push (off ledge), or Pull-attack (massive damage).
- Time your occupation of Slow + displace around sidestep.
- Check how much impairment some moves do; endeavour to notice ways to occupation them (Hold Y, X + X). Not applicable to all monster types.
- Target select/deselect; target change.
Become the Jedi you lot were meant to be!
Make as well as Use Saved Game Backups!
It’s a practiced sentiment to brand backups of your saved game at practiced acquire by areas (not to holler inwards full general inwards instance there’s a bug).
Then you lot tin re-create the file to a spare saved game location, as well as charge it upward to practice, modify it to some other saved expanse to practise other enemies, etc.
Or replay cool boss fights…! …like the arena for example…
This is piece of cake to do on PC (C:\Users\<username>\Saved Games\Respawn\JediFallenOrder\SaveGame00.sav to SaveGame04.sav). You tin brand copies of the saved game past times but doing Alt-Tab out of the game as well as copy. Do this for instance when you lot expire the rootage fourth dimension at a boss fight. You’ll withdraw hold access to replaying that boss acquire by anytime later!
To restore, the game is friendly to you lot replacing / renaming saved game files, but I alone tested doing this when I’ve quit out as well as the game is non running.
I don’t know close the console versions, but it’s worth exploring too.
Exploration
Briefly speaking: Exploration is rewarded non alone alongside lore, but alongside Skill Points (sometimes lots), as well as permanent boosts to your wellness as well as force, as well as Stims. This truly adds upward to your Combat abilities, so it’s definitely worth doing some exploration, unless you lot truly loathe doing it. Look for alternate paths, as well as yellow-wall areas on the map you lot haven’t explored.
Recommended Planet Order
The principal storyline is linear, but you lot do withdraw hold some pick equally to when you lot move to which planets, as well as when to move dorsum to planets you’ve already been to.
Minor spoiler alert: You tin notice to a greater extent than Stims, inwards special yellowish crates, for BD-1 to concur for you. Having to a greater extent than Stims makes a huge difference: you’ll terminal much longer inwards whatsoever given battle, avoiding many respawns as well as speeding upward your combat learning experience. I think it but makes the game to a greater extent than fun as well as less punishing. It makes a huge divergence specially for Boss fights. This department guides you lot through multiple Stim locations on the way.
To this lawsuit I recommend you lot move visit/revisit some planets at for sure points inwards the storyline:
- Story: Bogano; when done as well as gear upward to leave, you lot tin acquire a Stim: non equally good far from the Mantis (needs wall-run).
- Story: Zeffo (1st time): brand for sure to notice the extra Stim earlier you lot leave. Location Hint 1: It’s inwards Derelict Hangar… 2nd hint: inwards the cave non far after you lot encounter the two Skazz rats chomping on the dead stormtrooper.
- Recommended: move dorsum to Bogano, equally tipped off past times Cere. Just move to acquire the 2nd stim there, real closed to the Mantis, as well as double-back, you’ll come upward dorsum for to a greater extent than later.
Story: Kashyyyk (1st time) - Story: Zeffo (2nd time) BUT we’ll cutting this 1 short. Just move far plenty to acquire the Scomp Link, as well as so move dorsum to the Mantis earlier you lot accomplish a indicate of no-return. (Point of no provide happens when you lot exceed through the huge Venator reactor alongside iii flight robots inwards the Crash Site map, to Imperial Dig section.)
- NOTE: Game difficulty cranks upward a corporation notch at the 2nd Zeffo tomb (Tomb of Miktrull) as well as afterwards; it’ll live to a greater extent than fun if you’re prepared, so follow the side past times side few steps, specially if you’re playing on Jedi Grand Master. Refer to the Recommended Upgrades department to pass your Skill Points wisely! (you’ll wishing to maintain some aside ideally!)
- Recommended: move dorsum to Bogano, equally tipped off past times Cere. Upgrade Location: Go to the Abandoned Workshop, brand your trend almost to the top within the expanse that’s flooded at the bottom as well as has stairs going upward (with the squirrel-like animals leading the trend :). There’s an actual Workshop close the top behind a door you lot tin acquire through alongside the Scomp Link now. This volition give you… a overnice saber upgrade, along alongside a brusque explanatory cutscene, as well as a practise fight! (you tin acquire this same upgrade inwards Dathomir’s 1st department without that cutscene.)
- Recommended: Dathomir. There’s a 1st department you lot tin do anytime, which has two life essences (you withdraw iii for a life boost) as well as the monsters give you lot a lot of XP’s. You tin easily gain two Skill Points here. This planet tin live to a greater extent than punishing, but it’s made to experience worse than it is because of the ominous music as well as NPC comments. If you’re patient as well as figure out your enemies you’ll live fine. Now is a practiced fourth dimension to at to the lowest degree try. Eventually you’ll withdraw to move inwards the storyline, as well as you lot could do it all then.
- NOTE: Last risk to accumulate as well as maintain two to four Skill Points unspent, if possible, earlier going to Zeffo’s Imperial Dig. You’ll gain access to novel skills which terms 2-3 points each, so you lot don’t wishing to waste matter points on not-so-useful skills. This isn’t so critical at Jedi Knight difficulty, but real useful inwards Grand Master. You tin farm science points inwards Dathomir.
- Story: Zeffo (back for tertiary time). Now move to Crash Site, acquire this bonus: (make for sure to move upward the rope along the wall to the right of the arena alongside the large bad dude; life essence) Then brand your trend to the left to Imperial Dig etc, which volition Pb you lot toward the Tomb of Miktrull.
- After Tomb of Miktrull: NOW you lot tin Spend your accumulated Skill Points, to purchase Personalized Stims(2pts), as well as Power of Friendship(3pts).
The trend dorsum tin live confusing. Choose this road to acquire a Stim: when you lot come upward dorsum upward to the surface, after you’ve platformed your trend a flake as well as killed that trooper standing outside: caput inside, as well as so you lot withdraw hold two choices of where to go: accept the lift to your left (instead of going to your right). Cal volition comment that it’s convenient, as well as it “unlocks a shortcut” I believe. It’s a long trend downwards this elevator. Fight off enemies, as well as hold off on your holomap for the greenish ropes that are looped-up. You tin at nowadays Pull these. Make your trend toward these on the map, as well as hold off for a rope you lot tin line to your left at nowadays after a door. Going upward this volition convey you lot dorsum to Ice Caves, but you’ll acquire some other Stim upgrade earlier you lot do. Then maintain you lot trend into the cardinal Ice Caves expanse using the two ropes you lot tin pull. - Story: (new area, you’ll encounter 🙂 If you lot got your Power of Friendship upgrade, you’ll truly appreciate it.
- Story: Kashyyyk 2nd time: don’t missy the Stim you lot tin acquire earlier you lot leave of absence the expanse alongside the bouncy plants.
- Dathomir: Once you lot withdraw hold double-jump as well as tin acquire to the novel expanse you lot couldn’t before, if you lot wishing a boost earlier entering the Tomb of Kujet: plow so your dorsum is to the entrance (and you’re looking dorsum at the areas you lot but double-jumped, as well as move off to your left, to do a department that’ll give you lot some other Stim.
- … as well as at that spot is a lot to a greater extent than to do, but you lot withdraw hold grown much immature Padawan! Now is the fourth dimension for you lot to seek guidance from within. Trust your instincts, move forth as well as move the Jedi you lot were meant to be!
If you’re playing on Jedi Grand Master difficulty, I recommend you lot brand for sure you lot withdraw hold at to the lowest degree 5-6 Stims earlier Zeffo’s Imperial Dig (toward Tomb of Miktrull), as well as 8 earlier you lot acquire into the Tomb of Kujet the 2nd fourth dimension inwards Dathomir. If you’re playing on Jedi Knight, you lot tin withdraw hold 2-3 less than that.
Recommended Skill PointUupgrades
Ideally, you’ll wishing to maintain two spare (unspent) Skill Points points earlier you lot acquire into Imperial Dig. This is because the combat difficulty goes upward a large notch there, as well as there’s no trend back, AND you’ll gain access to several real useful skills in 1 lawsuit you lot consummate Tomb of Miktrull. But they terms two or iii science points, as well as you lot won’t brand plenty science points to purchase them earlier you lot withdraw them.
Note that in 1 lawsuit you’ve gained a Skill Point (or more), you lot never lose it, fifty-fifty if you lot expire many times. You tin alone lose progress toward a total science point.
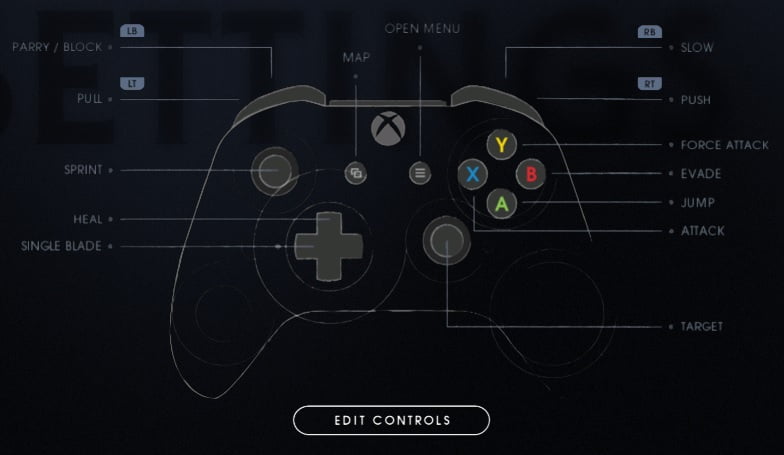
I’m using the Xbox controller conventions (see controller motion painting above).
Here are my recommended upgrades, inwards order.
- Overhead Slash (Y): You don’t withdraw hold a pick to purchase that one. Use sparingly because it uses Force as well as you lot wishing to maintain some strength to Slow enemy stim. It also is dull to execute so fourth dimension it well. It does practiced pretty impairment though, tin live useful at the start as well as halt of fight.
- Survival Skills: Increase Life
- Superior Blocking: Really helps you lot to hold upward attacks as well as figure out enemies, specially when novel to the game.
- Force Attunement: Increase Force, which helps you lot hold upward via Slow by as well as large initially (to Heal or attack).
- Improved Stims: Improve your Stims earlier Life (Enhanced Survival Skills). Because its bonus is effectively multiplied past times the pose out of Stims! Whereas a Life boost is alone once, when you lot Rest. See greenback below.
- Dash Strike (Hold Y): Useful to acquire an initial hitting on tough enemies. (and gives you lot access to other practiced skills)
- Delay Thrust (X + X): Very useful because it gives you lot extra range, as well as a powerful strike WITHOUT using Force! H5N1 key laid on for tough enemies.
- Agile Deflection (Run): real useful to automatically deflect blaster bolts spell running toward shooting enemies, and/or away from melee enemies
- Enhanced Force Recovery: Better Force Recovery. Before that, it seems you’re ever out of Force… And opens access toward Power of Friendship.
- Greater Force Attunement: More Force meter, BUT to a greater extent than importantly gives you lot access to the Power of Friendship.
- The Power of Friendship (3pts): An awesome upgrade, 1 of the best ones as well as most fun! Brings the Force dorsum inwards your game. Every fourth dimension you lot Stim, you lot acquire your total Force meter back! This allows you lot to occupation Force powers a LOT MORE, as well as makes a huge divergence inwards the hard fights. Plus it makes you lot move a badass Jedi.
Delay Combo (X + X) for double-saber. Makes grouping critter fights much easier (Dathomir spiders, rats etc), because your laid on combo is non-stop, as well as does practiced damage.
Personalized Stims (2pts)
others to your taste… - Expert Survival Skills (2pts): You don’t withdraw that 1 for a while, brand for sure to acquire the inwards a higher house upgrades before, as well as consider others too.
etc.
A greenback close Life vs. Stim upgrades. Keep inwards heed your Life bar is alone filled to the top when you lot Rest. After that, it’s alone filled past times the Stim amount. If you lot withdraw hold v stims, you’ll do goodness v times from a bigger Stim boost, whereas you lot benefitted alone in 1 lawsuit from a higher Life. So, Stim boosts give you lot much to a greater extent than total Life. On the other hand, if your Life bar is equally good short, it’s hard to occupation your Stim inwards time, so determine per your preference.
Lightsaber Throw (3pts): real expensive, but it does give you lot a ranged Attack, which you lot don’t acquire otherwise. And it looks truly cool! Important information to know: you lot all the same maintain your other one-half of the saber to block/parry/attack with, spell your other saber is flying. I didn’t purchase it until real tardily inwards the game because I sentiment Cal would live vulnerable to other enemies during the flight time. It’s non the case. Also, saber tin hitting multiple times, multiple enemies if lined upward well, on the trend out as well as so dorsum toward you. So, to a greater extent than powerful than it initially seems. Some enemies block it.
Perfect Evade: H5N1 real powerful upgrade. When you lot fourth dimension an Evade correctly, enemy slows downwards for a flake giving you lot to a greater extent than fourth dimension to Attack. Get it in 1 lawsuit it’s available (fairly late).
Life Essence upgrades: These are institute past times exploring inwards the game. Every iii you lot notice gives you lot a Life boost. They do add together upward as well as brand a difference! Likewise for the Force ones.